
Back eight years ago or so I published a short article on wintering bees in Michigan that to this day is one of the most visited pages on our website. This is not surprising, in that for many cold climate beekeepers, bringing bees through the winter remains one of biggest challenges. Our original article gives short step-by-step directions on how we prepared colonies for winter at the time, along with photos. At that time our family ran 30-40 colonies. Though the underlying principles remain the same, today we run considerable more colonies in different equipment, and the details of how we prepare our colonies for the winter has changed a bit over time in order to accommodate these changes in a scalable way.
I like to describe the essential components of wintering in a cold climate as the 3 M’s: mites (healthy bees), munchies (proper nutrition), and moisture (dealing with condensation). If you get these three components right, you’ve increased the odds of winter survival significantly. If you miss any of the three you will be cleaning up deadouts in the Spring. While there are a number of other things we can discuss, these in my experience are the most critical. What follows is an update on our current wintering practices.
The very first and most essential step in successful wintering honey bees actually begins in the spring and continues non-stop through the active bee season, until the bees are clustered again late autumn. If you do not actively monitor and manage for varroa mites in your colonies throughout the bee season you will not successfully winter your bees. You may get lucky once in a while, but varroa-infested colonies are essentially goners when faced with the long cold Michigan winter. The goal is to never let the mite populations reach a level of infestation in your colonies that causes damage. Hence it is critical that you actively monitor for varroa throughout the bee season to determine when and how frequently to treat, as well as after treatment to assess efficacy of your treatments. Twenty years ago, we used to get by by simply throwing a single treatment on in late August / early September but those days are gone! I would strongly encourage readers to install the MiteCheck app my team at GVSU put together with Meghan Milbrath and the Bee Informed Partnership. The app is available on Android and iPhone smartphones and has a number of really helpful interactive tutorials for learning how to do a sugar roll or an alcohol wash. Even if you have plenty of experience monitoring for mite, the app let’s you submit your mite counts which helps BIP keep the beekeeping community informed of mite infestation via the MiteCheck heatmap.
The second essential step in successfully wintering honey bees is to make sure the bees have enough nutrition. We winter our colonies on standard commercial 4-way bee pallets, in double deep colonies with a migratory cover. Honey supers are typically pulled by early August, so bees have a couple of months or so to build their winter nest. Fall honey flow is quite variable in our location, so we typically provide supplemental feedings to our bees beginning in late August / early September, and continue until the colonies are sufficiently heavy, hopefully before the weather gets cold. We feed each colony 2-4 lbs of pollen supplement and 2-5 gallons of thick syrup, depending on their need. Our goal is to make sure the top box is completely full and capped, and a good sized ring of nutrition in the bottom box as well. In years when the golden rod flow is productive, we may feed a bit less, but generally speaking we end up doing supplemental feedings every year. Pollen sub fed late summer or early fall stimulates a healthy round of brood rearing. If you’ve been managing mites, you go into winter with a big cluster of healthy young winter bees.
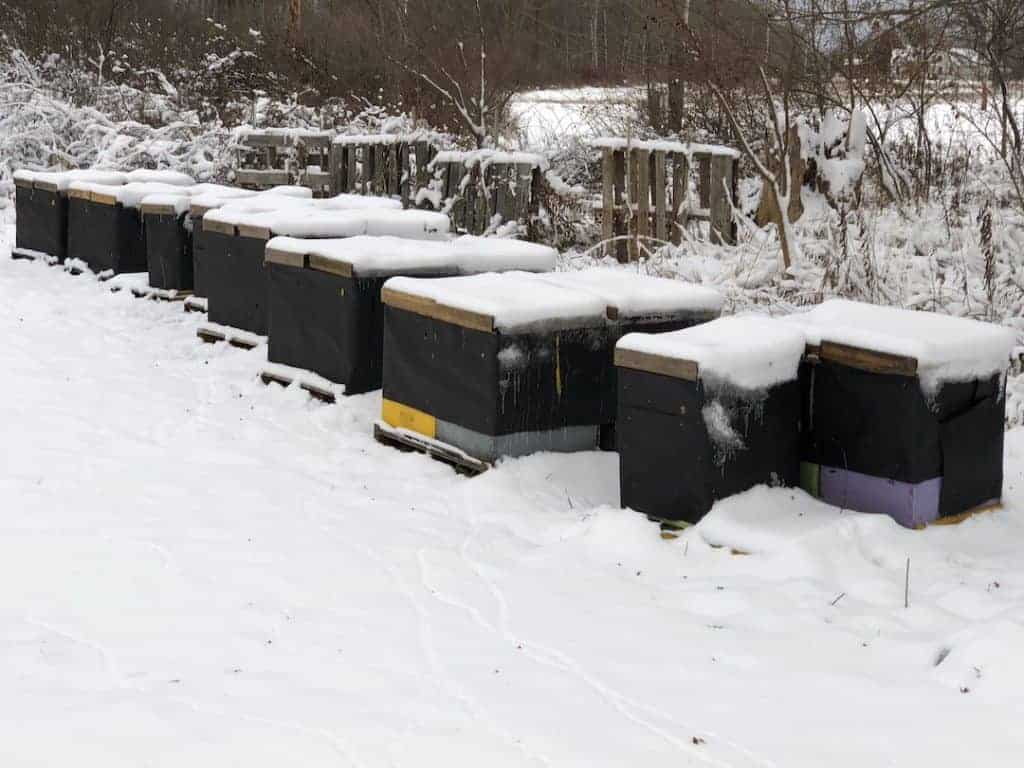
In November, when the weather gets cooler we haul the bees from their summer locations to our home yard where we can keep an eye on them over the winter months. We wrap each pallet of bees in a single layer of roofing paper. Not only does this help protect against the elements (yes, though we actively replace older boxes, you always have a few boxes here and there with gaping leaks, etc) but more importantly on warm sunny days during the winter helps absorb heat and gives the bees an opportunity to break cluster, cleanse, and re-cluster on food frames.
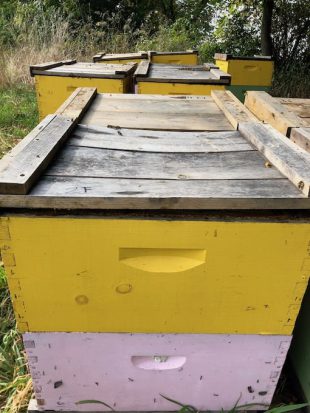
Another important consideration in successfully wintering bees is to make sure the cluster of bees stays dry. Moisture accumulates in the hive via two sources – external moisture (rain, snow melt, etc.) that gets in the hive, and internal moisture due to condensation. The former was never a problem for us when we used standard 10 frame equipment with an inner cover / telescoping outer cover. However, a few years back when we switched to migratory covers, we found they tend to warp and we’d get gaping holes on the edges that could leave the colony fairly exposed during the cold winter months (see photo).
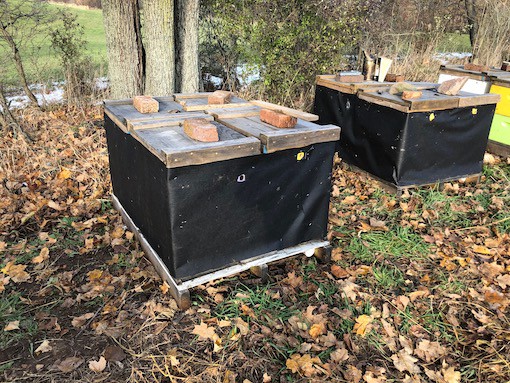
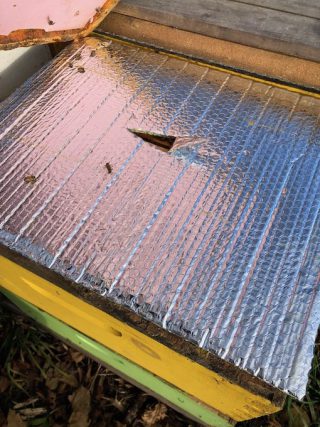
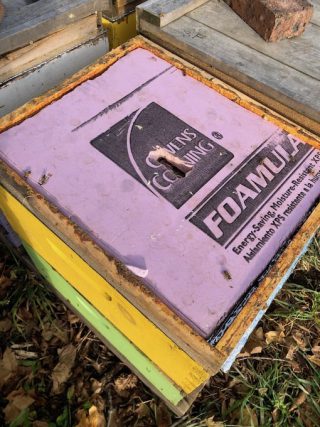
Taking a card from YouTube beekeeping sensation Ian Steppler’s playbook, we started making “inner covers” out of the insulation wrap product known a Reflectix. Reflectix can be purchased from Home Depot in 100′ rolls. If you get the 16″ size you can cut them down to size very easily. An inner cover like this gives a good top seal which eliminates the possibility of any rain / snow melt, etc from entering the hive. On top of this inner cover, we place a 1.5″ rim with a piece of pink foam insulation board inserted. Top insulation is very helpful in reducing condensation above the cluster, especially when using migratory covers. Without the insulation in place, the internal / external heat differential produces condensation on the top inner cover which will drip on the cluster. The top insulation keeps the bottom of the inner cover bone dry in the middle, with only a small amount of moisture around the extreme edges. The concept here is identical to the reverse of the cold beverage sleeve you put your cold drink in on a hot summer day. The exterior of the beverage sleeve stays dry because the cold interior beverage is insulated from the warm exterior air.
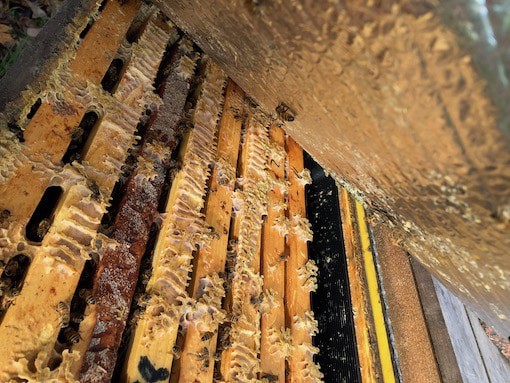
With a tight and insulated top as described above, it’s very important that the moist air coming off the cluster can escape. To facilitate this we bore a 1/2″ hole with a spade bit towards the top of the upper deep box. Not only is this helpful in venting, but also gives the bees a top entrance if the bottom clogs with dead bees, snow ice, etc.
In the past, when using conventional 10 frame bottom boards, we also inserted entrance reducers to keep mice from entering the hives when the bees went into cluster mode. When we moved to commercial pallets another approach was needed. Even if we reduced the entrances, we’d still have a problem as all of our pallets have drain holes drilled into them. It’s just about impossible to find a perfectly level place to put a pallet of bees, so the drain holes in the bottom help drain off any water that might accumulate. To control mice and reduce the damage they can wreak on combs during the winter, we’ve resorted to baiting for field mice. We place a small bait dispenser under each pallet (designed so that only a small mouse-sized rodent can get at the bait). While we still find a mouse nest here and there in the Spring, it effectively manages the problem and minimizes the damage.
Finally, the location of the hive during the winter is also important. Again, with conventional 10 frame bottoms we always made sure our entrances faced east or south. With 4-way pallets, that is simply not possible and we’ve discovered doesn’t really matter. The most important consideration is making sure you have a good windbreak. If the colonies have a good windbreak they will take their cleansing flights on warmer days no matter which direction the hive entrance is facing! However, colonies placed in a less protected location always seem to have higher losses in our experience. Another precaution we take is to place a brick or rock on each cover. While the bees are in more sheltered areas protected hopefully from the brunt of the winter winds, the extra weight is good peace of mind and also helps keep the cover pressed down tight on the rim giving a good tight seal around the edges.
This is our approach to wintering at present. Loss rates vary each season based on a variety of factors. We would consider a loss of 30% bad, and a loss rate of 10% exceptional good. Though we hit those numbers on the range extremities once in a while, we seem to average around 18-20% loss over the winter months. Helping our numbers is our practice of aggressively culling underperforming colonies during the active bee season either by requeening or replacing with our own queens/nucs during the active season, or consolidating colonies during the late summer / fall months.
It does seem in beekeeping one is always learning, so maybe in a few years, we’ll have yet a different story to tell. Feel free to share your wintering experiences in the comments of this post! Thanks for reading.
Great article. Thanks for updating. Was copying your previous process, but will try this out.
What is the thickness of the insulation?
Regards
Frank
@Frank we’ve played around with different thicknesses, but the 1 inch pink foam board seems to do the job with regard to eliminating condensation on the bottom of the top lid.
Are you boring the 1/2 inch hole near the top of the top brood box? If so, do you only use those in the winter? I am wondering if using a top hole in the spring/summer could lead to more robbing?
@Tom we’ve never seen an increase in robbing due to the holes bored in the hive bodies. However, the past couple of years we have not provided the top entrances as described in the article above and the bees seem to winter just as well. The foam board on top by itself seems to eliminate any condensation problems.